Dialogs
This section is organized to present the dialogs in the order in which they appear in MathType's menus and toolbars, left-to-right, top-to-bottom, beginning with the File menu.
File menu dialogs
Open dialog
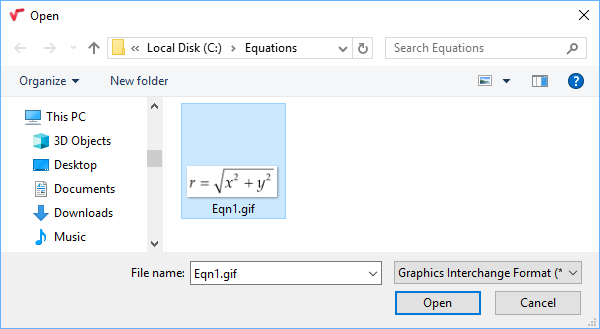
Use this dialog to open an equation file for editing. MathType 7 can edit any equation it creates, so choose from EPS, GIF, PDF (Mac only), PICT (Mac only), WMF (Windows only), "Equation files of any type" (Windows only), or "All files". Choosing "All files" is only for convenience and help in finding the file you need. It doesn't literally mean MathType 7 is able to open any file on your computer.
Save As dialog
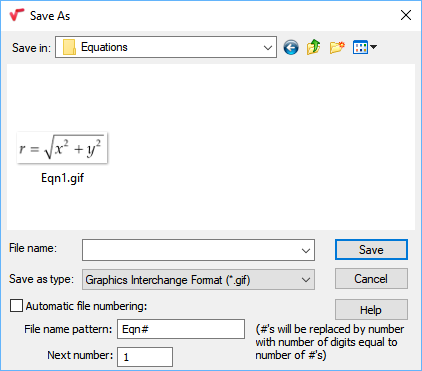
Use this dialog to save an equation as an individual file. Although you will most likely save equations in word processing documents using OLE or EGO, saving an equation as a file is useful for exchanging equations with other people, moving equations to other computers, saving as EPS for use in desktop publishing applications, or saving them as GIF for use in Internet publishing.
File Formats
MathType can save equations in several file formats. Use the Save as type pull-down menu to choose a format. No matter which format you choose, you can always open the equation file for later editing or use.
Adobe PDF (Mac only). PDF is an open standard document format that is the native metafile format for Mac OS X. Since OS X 10.4, most applications have been using PDF instead of PICT as their preferred image format. Use this file format when not working with Microsoft Office or Apple Pages (et.al.), unless your application requires one of the other file formats.
Encapsulated PostScript (EPS)
Encapsulated PostScript/none
Encapsulated PostScript/WMF (Windows only)
Encapsulated PostScript/TIFF (Windows only)
Encapsulated PostScript/PICT (Mac only)
EPS is a file format used for graphics in desktop publishing applications like Adobe InDesign and QuarkXPress. MathType can save equations in several kinds of EPS file, each defined by the type of preview image saved in the file. Within a desktop publishing application, the preview image is used to display the equation on screen, whereas the PostScript code itself is used only when printing. The WMF preview image (Windows only) is a Windows Metafile, a standard graphics format generally used only on computers with Microsoft Windows. The TIFF preview image (Windows only) is a cross-platform bitmap format. Use the none option if no preview image is desired. In this case, the EPS file will be a simple ASCII text file. The PICT preview image (Mac only) is a Mac PICT, a standard graphics format generally used only on Mac computers.
Windows Metafile (WMF). This is the standard graphics file format for the Windows operating system. Although the WMF format can accommodate bitmap images, the metafiles created by MathType are "draw"-style graphics and, therefore, are scalable and will print at full resolution. Use this format to import equations into drawing applications.
Mac PICT. Until Mac OS X 10.4, this was the standard graphics file format for the Mac operating system. Although the PICT format can accommodate bitmap images, the metafiles created by MathType are "draw"-style graphics and, therefore, are scalable and will print at full resolution. Use this format to import equations into drawing applications.
Graphics Interchange Format (GIF). GIF is a graphics file format generally used for line art (as opposed to JPEG which is best for photographs) in Internet publishing applications. It first became popular as the graphics format used in the CompuServe online system. Save equations in this format for the creation of web pages. Use the Web and GIF Preferences dialog to choose the resolution, transparency, and background color you want your GIF equations to have.
Automatic File Numbering
If you intend to create many equation files for import into another application (e.g. EPS files for import into a desktop publishing document or GIF files for a World Wide Web document), it can be handy to give them numbered file names, like "eqn003.eps". MathType can help you do this by automatically filling in the File name box in the Save As dialog with a name that follows a pattern you supply.
To enable this feature, check the Automatic file numbering option. MathType will then automatically generate a new file name using the pattern in the File name pattern box and the number in the Next number box. For example, if you enter a pattern of "eqn#" and a next number of 8, the next 3 equations you save will have names of "eqn8", "eqn9", and "eqn10".
Use several consecutive #s to indicate make the number part of the name have a particular width. In the above example, if you had entered a pattern of "eqn####", the file names would have been "eqn0008", "eqn0009", and "eqn0010". This will make them sort in a more natural order in sorted lists.
You may change the File name pattern or the Next number boxes at any time; for example, to indicate that the equations belong to a different chapter of your book, or to start the sequence at a new number.
Page Setup dialog (Mac only)
This File menu command opens your operating system's Page Setup dialog. There is not a separate Page Setup dialog for MathType 7
This File menu command opens your operating system's Print dialog. There is not a separate Print dialog for MathType 7
Edit menu dialogs
Insert Symbol dialog
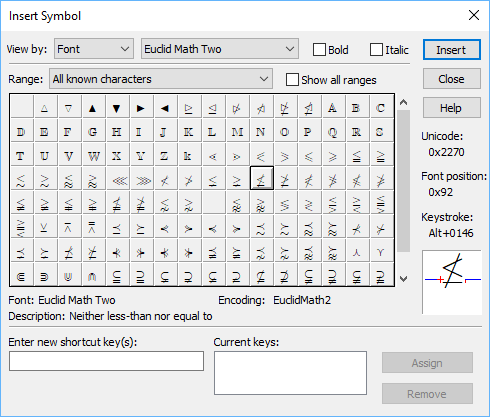
This is one of MathType most powerful dialogs. Some of the tasks you can perform are:
Insert a specific character or mathematical symbol into your equation
Add a frequently used symbol to the toolbar
Add a keyboard shortcut for a frequently used symbol
Find a symbol by matching words in its description
Dialog overview
The Insert Symbol dialog is divided into 3 vertical sections by 2 horizontal dividing lines:
Top section: The View by part is used to define what is displayed in the symbol grid.
Middle section: The Symbol grid shows 128 characters at a time.
Bottom section: The Shortcut section allows you to add or review keyboard shortcuts associated with symbols.
View by
This section consists of the View by menu and the items to the right of it (those above the line running under the menu). The items in this section control which characters are displayed in the Symbol grid. Here are the View by choices and how they work:
Font. Choose this option if you want to insert characters from a font whose name you already know, or if you want to browse through the available fonts. Once you have chosen this option, the font menu and Bold and Italic checkboxes will be available to let you choose the font and character style to view and insert.
Style. Choose this option to view the characters of the font currently assigned to a particular style.
Description. Choose this option to view characters from all fonts that have a certain word or phrase in their description. Once you have chosen this option, the New search button will be available to let you enter new description-matching criteria (see the Insert Symbol Search dialog). The Bold and Italic checkboxes will also be available to let you choose the character style to view and insert.
The current description-matching criteria will be displayed in the Description contains item.
Symbol grid
This section consists of 128 character cells that show the characters selected using the View by options. If Font or Style was chosen in the View by menu, the Range listbox and the Show all ranges checkbox will be visible. If Description was chosen in the View by menu, the Description contains text item and the Show one of each checkbox will be visible instead.
Range. This menu allows you to select which character range you want to see displayed in the grid:
All known characters: Shows all of the characters that MathType 7 believes are in the selected font (this is limited to MathType 7 knowledge of fonts and will not be available if it has no knowledge of the current font).
Entire font: Shows every character position in the font (will not be available for fonts with large numbers of characters).
Other ranges: Shows the characters in the given Unicode range.
Show all ranges. Check this box to force the Range listbox to show all Unicode ranges, not just those that contain characters in the current font.
Font. This item shows the font of the currently selected character in the symbol grid.
Description. This item shows the description of the currently selected character in the symbol grid.
Encoding. This item shows the font encoding of the currently selected character in the symbol grid.
Unicode. This item shows the Unicode value of the currently selected character in the symbol grid.
Font position. This item shows the index within the font of the currently selected character in the symbol grid.
Keystroke. This item shows the keystroke, if any, that may be used to type the currently selected character in the symbol grid. This keystroke will only be valid (i.e. will insert the character) when the font is the current font (or style, where the font in question is assigned to the style).
Enter new shortcut key(s). When the insertion point (cursor) is in the box, you may press a keystroke combination you wish to assign to the selected character. For modifier keys -- Shift , Command , etc. -- don't type out the spelling of the word into the box. Press the key and MathType 7 will enter the name of the key into the box. Shortcut keys may consist of one or two key combinations. For example, Ctrl+F is considered one key combination, while Ctrl+G , Shift+A is considered two key combinations. In MathType 7 shortcut notation, we'll separate the two key combinations with a comma:

Assigned to. If you choose a keystroke combination that is already being used for another symbol or template in MathType 7 this section will appear to let you know of that character combination's existing assignment. This is informational only. You may still use that character combination if you want, overriding the original character assignment.

Current keys. This section shows the keyboard shortcut, if any, associated with the currently highlighted character in the symbol grid.

Description contains. This item shows the current description-matching criteria entered in the Insert Symbol Search dialog.
Show one of each. Check this box to limit the symbol grid to show only one character (from the first font that contains it) for each description matched by the search criteria. If this box is not checked, all versions of each character whose description matches the search criteria will be shown. As each character may be present in many fonts, this might cause too many characters to be shown in the grid, making it difficult to find the character you want.

Insert Symbol Search dialog
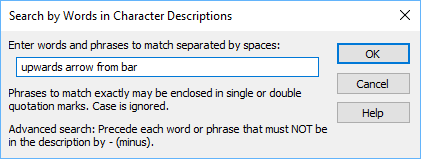
This dialog is used to set the character description search criteria for the Insert Symbol dialog. You can enter a text string that must match a character's description in order to appear in the symbol grid.
The match string
This text string can contain:
A single word that must be present in the description,
A phrase that must be present,
A combination of words and phrases, separated by spaces, all of which must be present, or
A word or phrase preceded by a dash (-) to indicate that it must NOT be present in a description for it to be considered a match.
Examples:
For simplicity, lets assume the character descriptions that we are trying to match are the following (instead of the thousands MathType actually contains):
Latin small letter m
Latin small letter n
Upwards arrow from bar
Rightwards arrow from bar
Bar operator
Black small square
Up harpoon (barb right)
Latin letter small capital A
If the search text is: | Matches from above list: |
|---|---|
small | 1, 2, 6, 8: they all contain "small" |
small letter | 1, 2, 8: they all contain "small" and "letter" |
"small letter" | 1, 2: doesn't match 8 as the words aren't in order |
bar | 3, 4, 5, 7: matches 7 because of "bar" in "barb" |
right | 4, 7: they both contain "right" |
right –wards | 7: doesn't match 4 because of "wards" in "rightwards" |
Notes
All matching is case-insensitive ("a" matches "a" or "A").
Matching is not by whole word ("right" matches "right", "bright", and "rightwards").
All words and phrases (unless preceded by '-') in the search text must be present for a description to be a match.
Custom Speech Text dialog (Windows only)
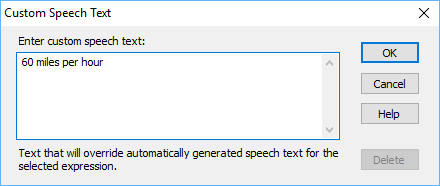
One method of preparing documents that can be read aloud with assistive technology (AT) is with the Publish to MathPage command in Word, and using MathML for the equations. Generally the default speech spoken by MathPlayer is appropriate, but there may be situations where you need it to speak text that's slightly different from the default. MathType provides a means for you to specify the text to speak.
小心
Note: MathType "custom speech text" feature requires MathPlayer 3.0 or later for the document to be read properly. MathPlayer is a free download .
To specify custom text, select the equation or equation fragment in MathType In the Edit menu, choose the Custom Speech Text command to launch the Custom Speech Text dialog.
In the Custom speech text window, type the text you'd like MathPlayer to speak, using only alphanumeric characters, periods, and commas.
To edit custom speech text that had been previously applied to an expression, follow the same procedure as above, replacing the old text with new.
To remove custom speech text, select the section of the equation to which custom speech text is applied, and choose the Remove Speech Text command from the Edit menu. If you no longer want custom speech text for any part c the equation, you may select the entire equation and apply the command.
小心
Note: The Custom Speech Text and Remove Speech Text commands are also on the contextual (right-click) menu. They perform the same function as the commands on the Edit menu, so use whichever set of commands is more convenient for you.
Example:

MathPlayer 4.0's standard text for the first fraction will be fraction 60 miles over hour end fraction. You'd like for MathPlayer to speak this text: 60 miles per hour. Select the first fraction in your equation, open the Custom Speech Text dialog, and type that text into the dialog. Click OK. In fact, you might want to also configure the dot to be spoken as "times" instead of "dot", and the other fractions to be spoken similarly to the first one.
View menu dialogs
Zoom dialog
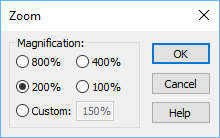
Open the Zoom dialog from the Other command of the Zoom flyout in the View menu. This dialog allows you to change the scale at which you see equations in MathType Increase the zoom scale to make it easier to see fine details of your equations. Reduce it to see more of your equations on screen. The zoom scale will not affect the size of equations in word processing documents or when they are printed.
Magnification
Select one of the preset magnification levels of 800%, 400%, 200%, or 100%, or select Custom to enter a different zoom level between 25% and 800% (e.g., 150%).
Format menu dialogs
Define Spacing dialog
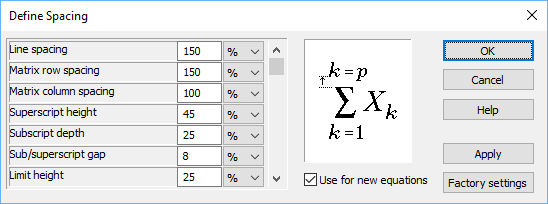
This dialog is used to view and/or modify the spacing dimensions for the entire equation or for new equations. Click in one of the spacing values to view a descriptive picture to the right that gives you an idea of where the particular dimension will be used in your equations.
Most spacing dimensions are distances. These distances can be entered in specific distance units or as a percentage of the Full typesize. The latter allows the spacing to change in proportion to the size you assign to Full in the Define Sizes dialog.
A few spacing values are percentages of some normal value, rather than distances. These are indicated in the spacing value description as (% of normal) and can only be entered as percentages. For example, the operator spacing setting is such a value. MathType 7 determines the spacing between operators and the variables to which they are applied according to the rules of mathematical typesetting but, if you desire, you can reduce this spacing by entering a percentage of less than 100%. Similarly, you can add more spacing by entering a percentage of greater than 100%.
Use for new equations
If this option is checked, the spacing dimensions will be changed both for the current equation and for new equations you create from that point on (see New Equation Preferences). If you uncheck this option, the spacing dimensions will affect only the current equation.
Default Settings
Click this button to restore the spacing dimensions in this dialog to the default settings.
Edit/New Color dialog
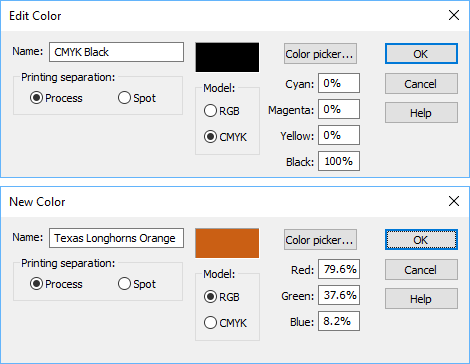
The Edit Color dialog has the same appearance and options as the New Color dialog, the difference being whether you are editing an existing color or adding a new one to the color menu. This dialog allows you to change the color attributes of the color selected in the Edit Color Menu dialog, or add a new color. Many of these attributes are only important if you plan to save your equations as EPS files for importing into publishing applications like QuarkXPress or Adobe InDesign. We'll refer to such applications here as publishing apps and the documents they create as publishing docs. For more detailed explanations of color printing, please refer to your publishing app's documentation.
Name
The name of a color will be shown in the color menu. It is also important in the creation of color EPS files.
It is important to use the same color names in MathType 7 as you used in your publishing docs. This way, like-named colors will be printed on the same color separation.
Printing separation
The two methods of color printing are Process and Spot:
Process color uses four ink colors: cyan, magenta, yellow, and black (also called CMYK). Other colors are printed using small dots of these colors in varying amounts.
Spot color uses ink of the specific color created by mixing inks of other colors.
Model
Colors can be specified using either the RGB model or the CMYK model:
RGB allows you to specify colors in terms of amounts of red, blue, and green. This is what you will normally use if you are coloring equations for use in presentations and simple printing.
CMYK allows you to specify colors in terms of amounts of cyan, magenta, yellow, and black. This color model is more appropriate for use in publishing docs, especially when printing using process colors.
Color values
Red Green Blue Cyan Magenta Yellow Black
Depending on whether you choose the RGB or CMYK color model, you can specify a color using 3 or 4 values, respectively. Each value is a percentage of the indicated color's intensity with 0% meaning to use none of the color and 100% meaning full intensity. You may enter numbers in 1/10ths of a percent if you wish. If you'd rather enter RGB values from 0 to 255, you may do this by clicking Color picker, then Define Custom Colors. On that dialog, you may define colors using HSL values or RGB values.
If you are importing equations as EPS files into a publishing app, the color name is more important than the actual color values you use in MathType since the definition of the like-named color in the publishing document will take precedence. All you need to do in MathType 7 is choose a color that is visually close to the color used in the publishing doc.
Color picker
Click this button to display the standard Windows or Mac Color picker dialog. See the Other Color dialog for details.
Edit Color Menu dialog
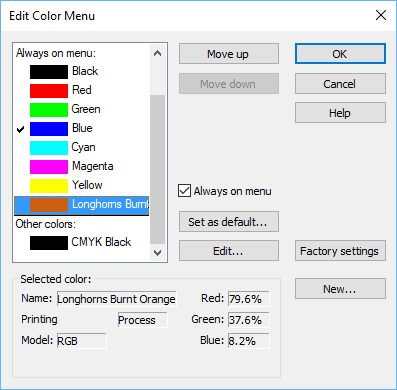
This dialog allows you to:
Add or remove colors from the Color menu
Name colors
Define the default equation color that will be used for new equations
Define advanced color properties for compatibility with publishing applications like QuarkXPress and Adobe InDesign
Always on menu
This list of colors consists of those colors that are always displayed in the color menu. The checked color is the current default equation color. The default equation color is the initial color used for all new equations you create. Changing the default color will not affect the current equation nor any other equations you have already created.
Other colors/Other colors in use
This list of colors consists of any other colors used in the equation in windows you currently have open.
Up/Down or Move Up/Move Down
Click these buttons to move the currently selected menu color up or down in the list, allowing you to put more frequently used colors near the top of the menu for easier access.
Set as default…
Click this button to choose the selected color as the default for new equations. Whenever you create a new equation, any characters you type will be given this color until you change the current color. Setting a new color as default does not affect the current equation.
New…
Click this button to add a new color to the menu. The Edit/New Color dialog will be displayed to allow you to define the new color. The new color will initially be a copy of the selected color.
Edit…
Click this button to display the Edit Color dialog, allowing you to edit the selected color.
Default Settings
Click this button to set the Color menu back its original, newly-installed state.
Other Color dialog
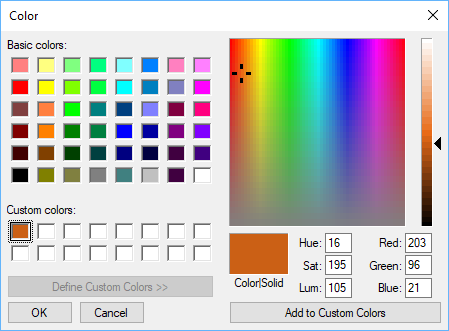
You can open this dialog (actually labeled Color on Windows, shown above, and Colors on Mac, shown below) one of several ways:
From the Format menu > Color > Other
From the Edit Color dialog > Color picker...
From the New Color dialog > Color picker...
From Web and GIF Preferences > Bitmap background > Change
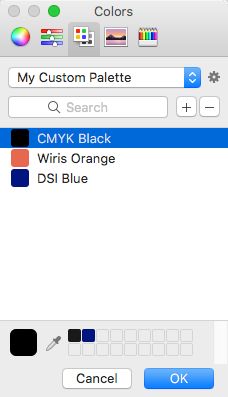
Like the Print dialog described above, this is not a dialog unique to MathType 7 This is the same Color dialog you would open if you are choosing a text color, for example, in Microsoft Word.
Fence Alignment dialog
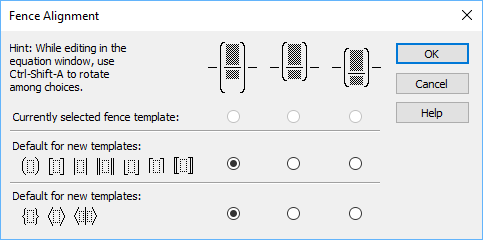
Use this dialog to control the vertical alignment of a fence template (brackets, braces, parentheses, etc.) with the rest of the line in which it resides. This dialog also allows you to set the default alignment for new fence templates. The template affected is the currently selected fence template or the one containing the insertion point.
Alignment options
Although the pictures above the three choices are intended to show how each affects alignment, the easiest way to see the effect of this control is to try it.
Here is a more technical description of the 3 choices:
|
|
|
The math axis of the contents is aligned with the math axis of the rest of the line, the fence characters are vertically centered with respect to the math axis and are sized to cover the contents. | The math axis of the contents is aligned with the math axis of the rest of the line, the fence characters are sized to cover the contents. | The fence characters are sized to cover the contents, then the template is vertically centered with respect to the math axis of the rest of the line. |
Default for new templates
These buttons allow you to select the default alignment for new fence templates you insert in your equation from now on. You can have a different default for the group of fence templates that have "pointy" characters from those that do not. This is because pointy fences need to be aligned with the math axis to look good but this is not as important for the others.
Line Spacing dialog
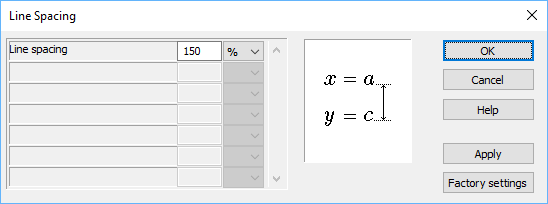
This dialog is used to change the line spacing of the line or lines in the current selection, or the line containing the insertion point. Line spacing is measured from the baseline of the line whose spacing is being changed to the baseline of the line below it.
You may choose from among this list of units for line spacing:
in (inches)
cm (centimeters
pt (points)
pi (picas)
% (of Full size)
Please note that changing line spacing in this dialog does not affect the line spacing used throughout the equation or for new equations. This can be changed in the Define Spacing dialog.
Default Settings (some versions say "Factory Settings")
Click this button to restore the line spacing to the default settings of 150%.
Matrix dialog
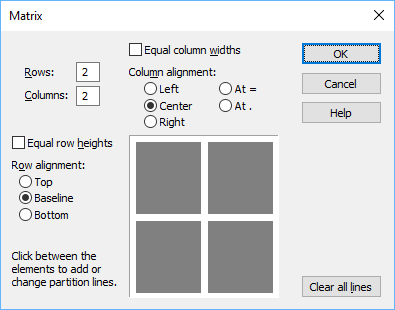
This dialog is used to define or modify the attributes of a matrix template. To create a new matrix, use a matrix template. To modify an existing matrix, select it or place the insertion point anywhere in it and choose Matrix from the Format menu. There are other options in the Matrix sub-menu of the Format menu. The Matrix dialog will appear when you choose Change Matrix.
Matrix size
# of Columns. Enter the number of columns desired for the matrix. Note that when editing an existing matrix, by reducing the number of columns, the contents of the deleted columns will be lost.
# of Rows. Enter the number of rows desired for the matrix. Note that when editing an existing matrix, by reducing the number of rows, the contents of the deleted rows will be lost.
Equal column widths
Check this option to force all the columns of the matrix to have the same width.
Column alignment
Choose either Left, Center, Right, At = (relational symbol), or At . (decimal point) to align all the matrix elements in all columns. In the current version of MathType it is not possible to apply alignment to a single column.
Equal row heights
Check this option to force all the rows of the matrix to have the same height.
Row alignment
Choose either Top, Baseline, or Bottom to align all the matrix elements in all rows. In the current version of MathType it is not possible to apply alignment to a single row.
Partition lines
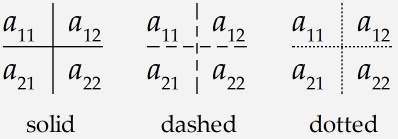
The preview image of the matrix allows you to add partition lines between the rows and columns of the matrix, as well as around the edges. Click between the elements to change the style of the line between the elements. Each click selects a different line style, rotating through solid, dashed, dotted, and none (no line at all). Compare:
Clear all lines
Click to remove all partition lines.
Style menu dialogs
Define Styles dialog
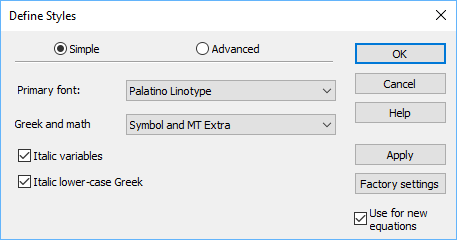
This dialog allows you to change the font and character style assigned to each style for the entire equation or for new equations.
This dialog has two panes, Simple and Advanced, that let you modify the styles in two different ways.
Simple
The settings on this pane allow you to quickly change the most common options. Choosing a Primary font assigns this font to the Text, Function, Variable, Vector-Matrix and Number styles. The Vector-Matrix style is set to bold and non-italic, while the other styles are all set to non-bold and non-italic, except for Italic variables which is controlled by its own checkbox. Choosing a Greek and math fonts option sets the L.C. Greek, U.C. Greek, Symbol and Extra Math styles to the given font set. The first font is assigned to L.C. Greek, U.C. Greek, and Symbol, and the second font is assigned to Extra Math. The bold and italic character styles are also turned off for these styles, except for Italic lower-case Greek which is controlled by its own checkbox.
The above rules for Simple mode are outlined in the table below:
Simple mode setting | Styles affected | Bold | Italic |
|---|---|---|---|
** controlled by checkbox. | |||
Primary font | Text Function Variable Vector-Matrix Number | Off Off Off On Off | Off Off ** Off Off |
Greek and math fonts | L.C. Greek U.C. Greek Symbol Extra Math | Off Off Off Off | ** Off Off Off |
If you make changes in the Advanced pane such that the above patterns of font and character style no longer apply, when you switch to the Simple pane the settings for Primary font and/or Greek and math fonts will be blank. Either choose new options, which will reset the bold and italic character styles to the default settings, or return to the Advanced pane to make minor changes.
Advanced
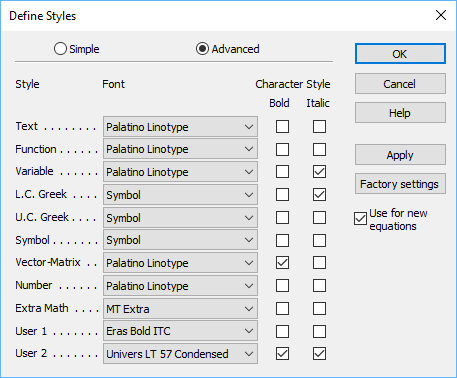
Use this mode to get finer control over your style assignments. You can assign a different font and character style to each of the 11 styles.
Use for new equations
If this option is checked, the style settings will be changed both for the current equation and for new equations you create from that point on (see New Equation Preferences). If you uncheck this option, the style settings will affect only the current equation .
Default Settings
Click this button to restore the style settings in this dialog to the default settings.
Support for international keyboards
If your primary written language uses a non-Roman character set (e.g. Greek, Cyrillic), you probably have more than one logical keyboard installed on your computer (Input Locales in the Keyboard section of the Windows Control Panel) that you can switch between using either a keyboard shortcut or the keyboard menu in the System Tray, next to the clock in the Windows Taskbar. If you don't have one now, you may want to add one to make it easier to type Roman alphabet characters for math. Most mathematics in the world uses the Roman alphabet, and since many non-English keyboard layouts have replaced some of the useful math keys (e.g. +, <, >) by alternate characters, it is often more convenient to have both an English keyboard and a non-English keyboard installed.
MathType 7 has a special feature for users that have multiple logical keyboards. You can cause the current style to switch to Text whenever you switch to the keyboard for your native language and switch back to math when you switch to the English keyboard. Similarly, you can make the keyboard switch whenever you change style to Text and switch back when you choose a different style, presumably to type more math.
If you have multiple logical keyboards, the Language/Keyboard section, shown here, will be displayed at the bottom of the Define Styles dialog.

Text style
This menu allows you to choose the keyboard to associate with the Text style. Whenever you switch to the keyboard chosen here, MathType 7 will switch the current style to Text and vice-versa. To break this association, choose Any.
Other styles
This menu allows you to choose the keyboard to associate with all styles except Text. Whenever you switch to the keyboard chosen here, MathType 7 will switch the current style to Math and vice versa. To break this association, choose Any.
Other Style dialog
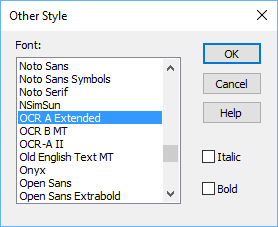
Use this dialog to assign a particular font and character style to selected characters or subsequently typed characters.
We recommend that you use styles rather than explicit fonts and character styles as much as possible, to take advantage of MathType 7 "intelligent" application of mathematical typesetting rules.
Size menu dialogs
Define Sizes dialog
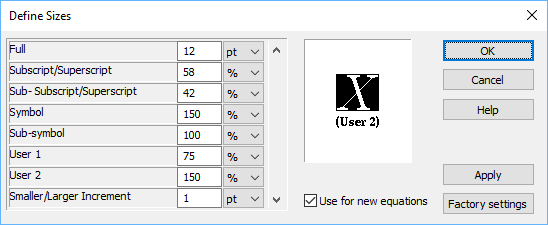
This dialog is used to view and/or modify the absolute or relative sizes assigned to typesizes for the entire expression or for new expressions. Click in one of the typesize values to view a descriptive picture to the right that gives you an idea of where the particular size will be used in your equations.
Changing the main font size of equations
The main font size of an equation is the point size used for most of the equation, as opposed to the size used for subscripts and large symbols, like summation signs and integrals. In MathType 7 system of typesizes, the main font size is called Full size. To make it easy to change the font size of equations as a whole without changing the proportions between the various sizes, MathType 7 allows you to define all of the other typesizes as percentages of the Full size. So, to change the size of the equation as a whole, you can just enter a new point size for Full size, and all of the other typesizes will be changed relative to it. If you wish to assign sizes that are not relative to Full size, you can assign absolute sizes to any or all of the typesizes in units of inches, centimeters, points, or picas.
Use for new equations
If this option is checked, the sizes will be changed both for the current equation and for new equations you create from that point on (see New Equation Preferences). If you uncheck this option, the size settings will affect only the current equation.
Default Settings
Click this button to restore the sizes in this dialog to the default settings.
Other Size dialog
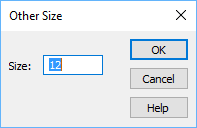
Use this dialog to assign a particular point size to selected characters or subsequently typed characters. You must enter the size in points (decimal fractions are allowed).
We recommend that you use a system of typesizes rather than explicit sizes as much as possible, to take advantage of MathType 7 "intelligent" application of mathematical typesetting rules.
Preferences menu dialogs
Customize Keyboard dialog
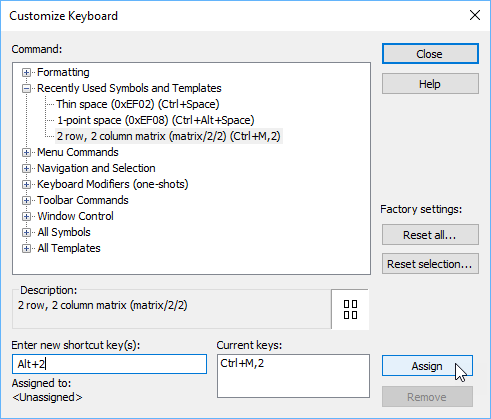
This dialog allows you to review, assign, and remove keyboard shortcuts for all MathType commands, symbols, and templates. Characters that were recently inserted using the Insert Symbol dialog and characters that currently have shortcuts assigned to them are also shown here. Use the Insert Symbol dialog to assign keyboard shortcuts to other characters.
Command. This pane shows all of MathType commands, symbols, and templates organized in a tree hierarchy. Click on each item in the tree to see the item's description shown in the Description box. Items with an icon to the left are categories of commands. Click on the icon to expand and collapse the tree to hide and show the submenus. All non-category items represent commands, symbols, and templates to which you can assign keyboard shortcuts.
Description. This area displays a description of the item currently selected in the Command pane.
Close. Clicking this button closes the dialog. There is no Cancel button. Use the Reset all button to restore all shortcuts to their default settings or the Reset selection button to restore an individual item.
Reset all. Click this button to restore all shortcuts to their default settings.
Reset selection. Click this button to restore the keyboard shortcuts for the currently selected command, symbol, or template to its default settings.
These dialog items are described in Assigning and Removing Keyboard Shortcuts:
Enter new shortcut key(s)
Current keys
Assign
Remove
Cut and Copy Preferences dialog
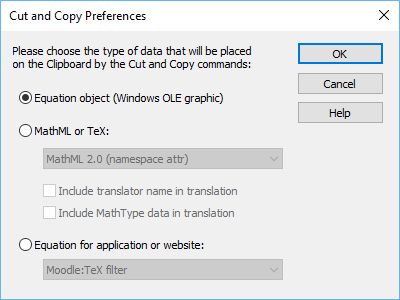
This dialog allows you to specify what kind of information will be placed on the clipboard whenever you use the Cut or Copy commands on the Edit menu, or when you drag & drop an equation from the MathType 7 editing window. (For the remainder of this topic, when we use the terms cut, copy, and/or paste, the same behavior applies to drag & drop, but we will not explicitly state such.) Normally, Cut or Copy will place a graphic image of the selected part of the equation onto the clipboard, ready to be pasted into a document. However, using the options in this dialog, you can have the selected equation or fragment translated into text in one of the computer languages or for one of the applications or websites for which a translator is available.
Equation object (Windows OLE Graphic; Mac PICT)
Click this option to place an equation object on the clipboard. This is the default and is normally used to transfer equation material between one MathType 7 window and another, or between a MathType 7 window and another application, such as a word processor. When you paste an equation into another application's window, how it is handled depends on that application. If the application is EGO- (Mac) or OLE-compatible, it will be treated as a new EGO or OLE object. If the application is not EGO- or OLE-compatible, it will be treated as a graphic image.
MathML or TeX
MathType 7 is supplied with several translators that allow equations to be translated into other computer languages, TeX and MathML. Click this option to cause MathType 7 to translate the selected equation whenever you use the Cut or Copy command.
Use this listbox to choose from one of the translators currently available to MathType 7 The text of each list item describes the computer language (or variant) that the translator can translate equations into. In addition to the translators that are installed as part of the MathType 7 product, there may be other translators available from third-party sources. It is also possible to create your own translator or modify an existing one. See Working With MathML and Working With TeX for information on the translators that are installed with MathType 7
Include translator name in translation
This option instructs the translator software to place the name of the translator in the translation. This is used by MathType 7 integration with Microsoft Word to allow its Convert Equations command to find the equations in the document. If you are using MathType 7 with a TeX application instead of Word, you should leave this option unchecked. Some translators may ignore this option.
Include MathType 7 data in translation
This option instructs the translator software to place MathType 7 equation representation in the translation. This allows the equation to be pasted back into MathType 7 for later editing and should normally be checked. Some translators may ignore this option.
小心
Note:
It is possible to paste raw TeX into MathType 7 and normally MathType 7 will understand it and produce the equation you want, but be aware that if you clear this option, you may not be able to completely edit the resulting text equation in MathType 7 or convert it back to a MathType 7 equation object using Convert Equations in Word. Therefore, you should use care when clearing this option.
Equation for application or website
Many applications and websites accept TeX or MathML, but may mark it up in a special way, or with special delimiters. For example, instead of $\frac{1}{2}$, some applications want [math]\frac{1}{2}[/math]. By selecting the appropriate application or website from this list and copying the equation from MathType 7 you don't have to worry about specific formats for your favorite applications & sites.
Functions Recognized dialog
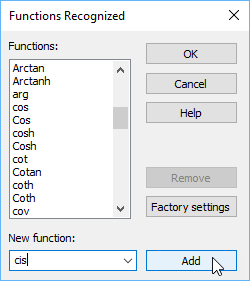
MathType 7 automatically recognizes standard mathematical function names like "sin" and "log", and applies the Function style to them. You can use this dialog to customize the set of functions MathType 7 will automatically recognize.
Removing a function
To remove a function from automatic recognition, select its name in the list box and then click Remove. If you feel you have removed a function by mistake, you can click Cancel to discard your changes or Reset to restore the list of functions to MathType default settings .
Although you might have removed a function from automatic recognition, you still can give a specific function name the proper style using commands on the Style menu.
Adding a function
To add a function to the list, type its name in the New function box, then click Add.
Limitations on new functions
Functions can consist of up to 15 characters, each of which must be a character that MathType 7 would normally place in the variable style, which means accented and un-accented alphabetic characters only. Punctuation, numerals, and operators are not allowed.
Load Equation Preferences dialog
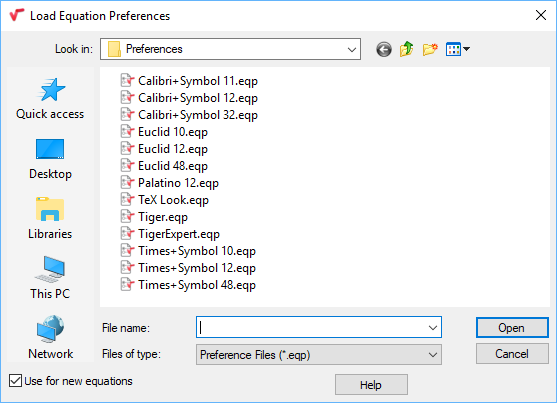
The Load Equation Preferences dialog, and the next 2 listed below, are available through the Equation Preferences flyout of the Preferences menu. You can use this dialog to load an equation preference file that was saved earlier using the Save Preferences dialog. If you want to change the equation preferences of several or all equations in a Microsoft Word document, use the format equations command from Word. See Format Equations dialog. This dialog works like any other File Open dialog, with an additional checkbox item described below.
Use for new equations
If this option is checked, the equation preferences will be used both for the current equation and for new equations you create from that point on (see New Equation Preferences). If you uncheck this option, the equation preferences will affect only the current equation.
Load Equation Preferences from Factory/Default Settings dialog
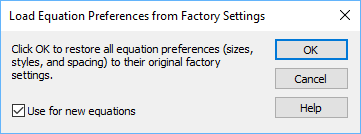
Use this dialog to control whether you want to reset equation preferences (sizes, styles, and spacing) to the default settings for the current equation and, optionally, for new equations you create from now on. Uncheck Use for new equations if you only want to change the preferences for the current equation.
Load Equation Preferences from File dialog
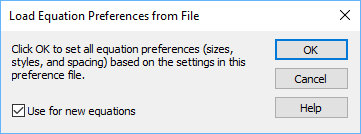
This dialog appears whenever you open an existing equation preferences file by selecting it from the Preferences menu or by dropping it onto MathType Click OK to set the equation preferences for the current equation as specified in the file, or Cancel to quit.
Use for new equations
If this option is checked, the equation preferences will be used both for the current equation and for new equations you create from that point on (see New Equation Preferences). If you uncheck this option, the equation preferences will affect only the current equation.
Object Editing Preferences dialog
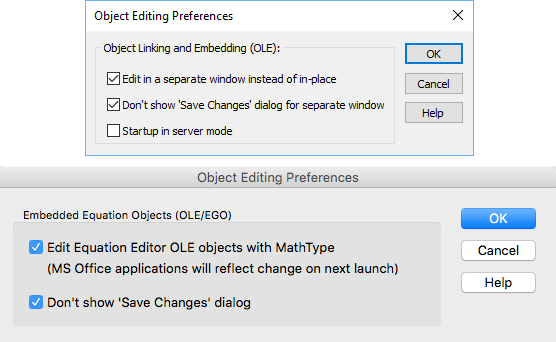
Use this dialog to make choices that affect editing of equations from within your word processor and other OLE-compatible applications.
Edit in a separate window instead of in-place (Windows only)
Check this option if you prefer editing equations in a separate window from your word-processing document. This can make editing easier by allowing you to work at a different zoom level than in your word processor so you can more easily see small characters, like superscripts, primes, and dots.
Uncheck this option if you prefer editing equations directly in the document. Some applications may not support this feature. In this case, editing will always be in a separate window.
Edit Equation Editor OLE objects with MathType 7 (Mac only)
Check this option if you want to use MathType to edit equations that were created with the Equation Editor program included with Microsoft Office. When checked, any time you double-click one of these equations for editing, a MathType window will open containing the equation, instead of an Equation Editor window. We recommend you leave this option checked.
小心
It's entirely likely that you don't have Equation Editor any longer on your computer. It is no longer installed in new installations of Microsoft Office, so if you have installed the Office update that removed Equation Editor, leaving this box unchecked will likely invoke an error message.
(Both Mac and Windows) If you need to collaborate with other authors who do not own MathType we recommend they download the MathType 7 trial. See Collaborating with Equation Editor users for more details.
Don't show 'Save Changes' dialog (Windows adds for separate window)
Check this option if you want to suppress display of the Save Changes dialog that normally appears when you close the equation window after making changes. Your changes will then be saved into the document automatically.
Startup in server mode (Windows only)
Check this option if you prefer that MathType start in server mode whenever you edit an equation for the first time in an editing session. This makes equation editing more responsive but you must exit MathType separately when you are finished working with equations.
Save Equation Preferences dialog
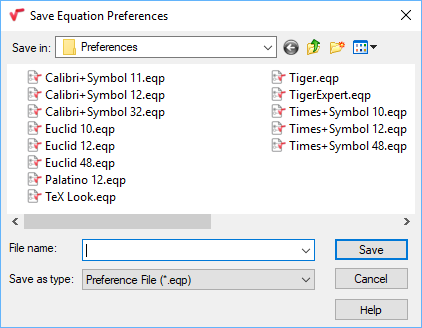
Use this dialog to save a preference file containing the equation preferences from the current equation or the New Equation Preferences. Preference files created here may be used in the following situations:
In the Load Equation Preferences dialog
In the Format Equations command in Microsoft Word
In the Set Equation Preferences command in Microsoft Word
On the MathType command line
This dialog works like any other File Save dialog.
Web and GIF Preferences dialog
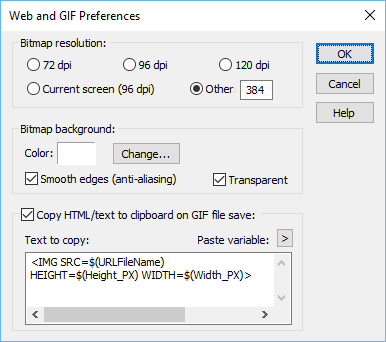
This dialog allows you to:
Set the resolution, dots-per-inch (dpi), of the GIF equation files you save;
Set the background color for GIF files;
Adjust GIF options such as transparency and smoothing;
Set HTML/text to be copied to the clipboard when a GIF is saved.
Bitmap resolution
Use these items to set the resolution (dpi) of the GIF equation files you save from now on. The preset values are: 72 dpi, 96 dpi, and 120 dpi. Current screen (nnn dpi) shows the resolution that your monitor is currently running at, and Other allows you to enter any other dpi to use when saving GIFs. For example, 300 or 600 dpi is good for print quality GIFs.
Bitmap background
Use the Change button to bring up the Color dialog to set a new background color.
Smooth edges (anti-aliasing). Check this option to create GIF equation images with smooth edges. This is done by using a technique called anti-aliasing. Pixels on the edges of each character are given colors that are intermediate between the character color and the background color. Smoothing generally works best on characters larger than 12pt, so you may want to experiment.
Transparent. Check this option if you want the background of GIF equation images to be transparent, allowing the background of your web page to show between the characters of the equation.
Using transparency with smoothing. You can use these options together. However, to get the best results you should understand how they interact.
Smoothing will be performed using the background color, as described above, even when the Transparent option is checked. In this case, non-transparent pixels will be generated around the edges of the characters. The colors of these pixels will be just as they would if the Transparent option was not checked. This will only look good if the background color of the web page is close to the background color set in this dialog. The closer they are, the more effective the smoothing will be. If the background is highly patterned, you may find equations look better with the Smooth edges option turned off.
Copy HTML/text to clipboard on GIF file save
Check this option if you want MathType to put a fragment of HTML (or any other text) on the clipboard every time you save an equation in GIF format. This is useful when you run MathType at the same time as your favorite web page editor. After you create and save each equation, just switch to your editor and paste the HTML code or other text in.
Paste variable. This menu can be used to paste a variable into the HTML/text fragment you enter in Text to copy. When you save an equation, the variables in the HTML/text will be replaced by the corresponding value for the generated GIF. Variables are identified by the form $(variable). For example, $(URLFileName) will be replaced by the name of the GIF equation file you just saved, in URL-escaped form.
The available variables are shown in the table below. The sample values are based on a GIF saved in Windows as
C:\Program Files\MathType\File 1.gifor in macOS asMac HD:Users:testing:Desktop:File 1.gifwith a height=37 pixels, width=80 pixels, and a baseline adjustment of 12 pixels.In the table, where the Sample Values are different for Windows and Mac.
Variable | Description | Sample Values |
|---|---|---|
URLFileVolume | URL File Volume | C: Mac HD |
URLFileDirectory | URL File Directory | /Program%20Files/MathType Users/testing/Desktop |
URLFileName | URL File Name | File 1.gif |
FileVolume | File Volume | C: Mac HD |
FileDir | File Directory | \Program Files\MathType Users:testing:Desktop |
FileName | File Name | File 1.gif |
Height_EM | Height in EMs | 3.0 |
Height_PX | Height in pixels | 37 |
Height_IN | Height in inches | .51 |
Height_MM | Height in millimeters | 13.0 |
Height_PT | Height in points | 37.0 |
Width_EM | Width in EMs | 6.6 |
Width_PX | Width in pixels | 80 |
Width_IN | Width in inches | 1.11 |
Width_MM | Width in millimeters | 28.2 |
Width_PT | Width in points | 80.0 |
Base_EM | Baseline in EMs | 1.0 |
Base_PX | Baseline in pixels | 12 |
Base_IN | Baseline in inches | .16 |
Base_MM | Baseline in millimeters | 4.2 |
Base_PT | Baseline in points | 12.0 |
Base_% | Baseline as % of height | 32 |
Workspace Preferences dialog
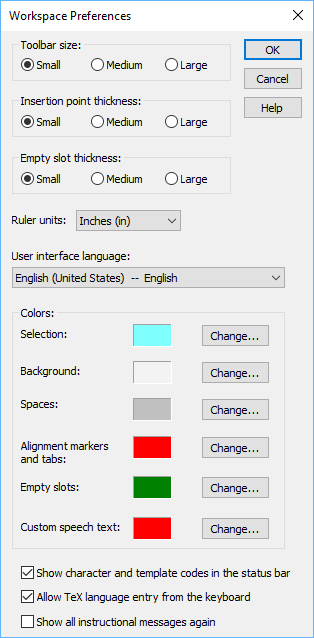
Use this dialog to change settings that affect MathType working environment.
Toolbar size
You can use this section to make the toolbar larger, in case you find the toolbar icons too small to see easily, or to make it smaller, if it is taking up too much space on the screen. You can also make the toolbar take up less screen space by hiding unused bars (see the View menu).
Insertion point thickness
You can use this section to choose an insertion point thickness that suits you.
Empty slot thickness
In normal view (see Show Nesting on the View menu), empty slots are displayed as dotted boxes. Use this section to set a thickness that suits you. You can also set the color used for empty slots (see Empty slot color below)
Ruler units
Use this menu to set the spacing units for the graduation marks displayed in the ruler to either inches, centimeters, points, or picas.
User interface language
If you have MathType installed in more than one language, this item appears in Workspace Preferences. With the dropdown list, you can change the language used for the MathType 7 user interface menus, titles, and tooltip/status bar text. When you change MathType 7 language, you must restart MathType for it to take effect.
Colors
Selection. Default color is aqua. Click the Change button to change the color used for selection. When you select all or part of an equation, either by dragging the mouse pointer across it, by using the Shift key in combination with the arrow keys on the keyboard, or by choosing the Select All command, the selection appears with the background color chosen here. Variables, symbols, and other parts of the equation will remain in whatever color you have chosen in the Color picker (on the Format menu -- default black), so if you choose a dark selection color and a dark equation color, you may have trouble seeing the parts of the equation in the selection.
Background. Default color is white. Click the Change button to change the color used for the background of the MathType 7 equation editing area in normal view (see Show Nesting on the View menu).
Spaces. Default color is gray. Click the Change button to change the color used for spaces. This color only applies to the spaces added manually, not to automatic spacing applied by MathType Spaces are normally invisible, but are displayed if Show All is checked in the View menu.
Alignment markers and tabs. Default color is red. Click the Change button to change the color used for alignment markers and tabs. These normally invisible markers are displayed if Show All is checked in the View menu.
Empty slots. Default color is green. Click the Change button to change the color used to display empty slots in normal view (see Show Nesting on the View menu). You can also set the thickness of the empty slot box (see Empty slot thickness above).
Custom Speech text (Windows only). Default color is red. Click the Change button to change the color used to underline the part of an equation for which you've specified Exact Text in the Custom Speech Text dialog. Note that Show All must be selected in the View menu in order for this color to take effect.
Show character and template codes in the status bar
Check this option to show the character and template codes in the Status Bar. These will be displayed when the mouse pointer is over a toolbar cell containing a symbol or template and in the Insert Symbol dialog. These character codes are useful to translator writers, for example.
Allow TeX language entry from the keyboard
Check this option to allow keyboard entry of a subset of TeX that is supported by Wikipedia. See Working With TeX and Using TeX Language Input.
Show all instructional messages again
Occasionally, a one-time message will appear explaining different features of MathType These can be turned off on the message dialog. To have these messages appear again, check this option.
Help menu dialogs
Unlock/Register MathType dialog
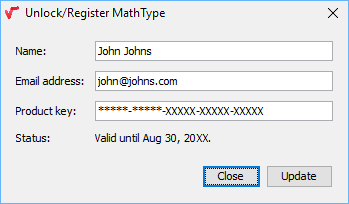
This dialog allows you to unlock MathType to enable full functionality.
To unlock MathType you must have a valid product key. You can obtain one by purchasing a copy of MathType either directly from us or from a dealer. You can purchase MathType online from our secure web store, contact us directly via email at sales@wiris.com, or by phone at (800) 827‑0685 (U.S. and Canada) or (562) 432‑2920 (rest of the world).
Once you've obtained a product key, enter your information.
In order to receive free technical support, upgrade notices and special upgrade pricing, register your copy of MathType by entering your email and ensuring the check box that allows the installer to send your information to Wiris is selected.
Toolbar dialogs
Expression Properties dialog
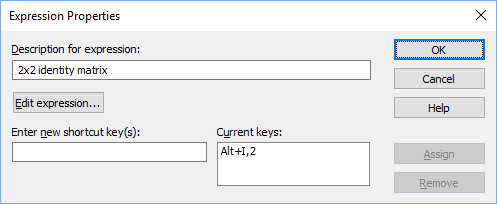
This dialog allows you to:
Enter or edit the status bar description associated with a toolbar expression;
Edit the expression itself;
Add or remove the keyboard shortcut that may be used to insert the expression into an equation.
Description for expression
This item defines the text that will be displayed in the status bar when the mouse pointer is over the toolbar cell. If you have defined a keyboard shortcut for the expression, it will be displayed as well.
Edit expression…
Click this button to open a new equation window containing the expression. Once you have made changes, just close the window and save the expression.
Ruler Units dialog
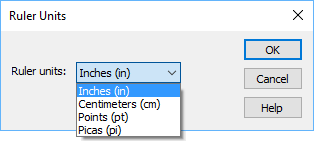
Default units for ruler graduations are inches. If you prefer to work in centimeters, points, or picas, you can double-click the ruler to bring up the Ruler Units dialog. Make your choice of ruler units and click OK.
Tab Properties dialog
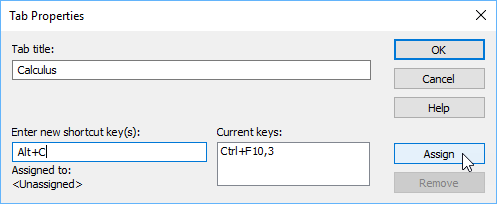
This dialog allows you to edit the text in the toolbar tabs and also assign a keyboard shortcut that brings the tab to the front. To display this dialog, simply double-click on the tab you want to edit or right-click it and choose Properties.
Dialogs not associated with a menu or toolbar
Equation Conversion Manager (Windows only)
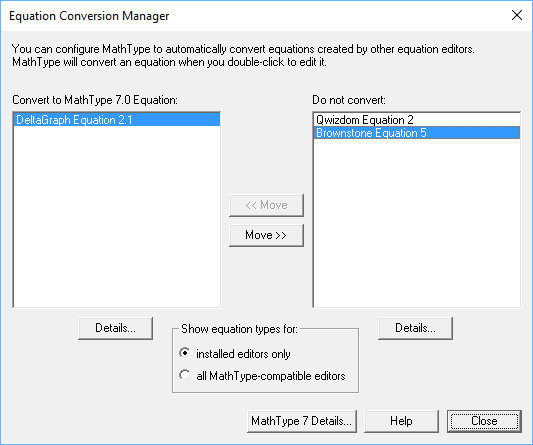
You can use the Equation Conversion Manager to control the kinds of equations for which MathType will be the designated editor. For example, once you have installed MathType 7 double-clicking an equation you created using the DeltaGraph Equation 2.1, as in the example above, will automatically convert it to a MathType 7 equation. If you don't like this, Equation Conversion Manager is the tool you use to change it.
Running the Equation Conversion Manager
To run the Equation Conversion Manager, simply choose it from the MathType 7 sub-menu of the Windows Start menu. A dialog will be displayed with two lists of equation types:
The left list contains equation types that will be converted to MathType 7 equations when you double-click them.
The right list contains equation types that will not be converted, but will be edited using the equation editing application that was used to create them.
Use the two Move buttons in between the lists to move selected equation types from one list to the other.
Show equation types for
This part of the dialog allows you to show just those equation types for which the editor is installed (installed editors only) or show all equation types even for those that are part of products you do not own (all MathType 7 editors). The latter choice allows you to decide which editor is used for equations contained in a document that an associate might give to you.
Details
Click this button to see details of each equation editor's OLE registration. This is information that is only useful for troubleshooting OLE problems.
MathType 7 Details
Click this button to see details of MathType OLE registration. This is information that is only useful for troubleshooting OLE problems
MathType Server dialog (Windows only)
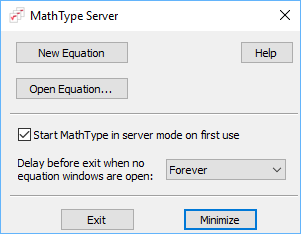
This dialog is displayed when MathType is started in "server mode". Normally when you edit equations using the Insert Object command, use the Insert Equation toolbar button, or double-click an equation in your word processor or other OLE-compatible application, MathType is started and stopped each time. Server mode avoids the frequent starting and stopping by keeping MathType running during your entire equation editing session.
There are several ways to start MathType in server mode:
Choose the MathType 7 Server item in the MathType 7 sub-menu in the Windows Start menu.
Check the OLE Startup in server mode option using the Object Editing Preferences command on the Preferences menu.
Run MathType with "-server" on the command line.
When MathType is running in server mode, it will stay running until you click Exit in the MathType 7 Server dialog or, optionally, you can use the timeout feature that will automatically terminate MathType after it has been idle for a length of time you specify (see Delay before exit when no equation windows are open, described below). See Object Editing Preferences dialog and MathType's Command Line Options.
New Equation
Click this button to open a new, untitled equation window. This command is the same as the New command on the File menu.
Open Equation…
Click this button to open an existing equation file. This command is the same as the Open command on the File menu.
Help
Open the MathType 7 documentation to this page.
Start MathType 7 in server mode on first use
Check this option if you want MathType to start in server mode whenever you do the first OLE equation editing operation. This option is also available in the Object Editing Preferences dialog.
Delay before exit when no equation windows are open
This menu allows you to choose the length of time before MathType will automatically terminate after it has been idle. Any kind of equation editing operation or just viewing this dialog will reset the timer. If you choose Forever from this menu, MathType will only exit when you click Exit in this dialog or from the File menu of an equation window.
Exit
Click this button to terminate MathType immediately. If there are any equation windows open that contain unsaved changes, you will be asked if you want to save them.
Minimize
Click this button to minimize this dialog. This has the same effect as clicking the minimize button in the top-right corner of the dialog.


