
-
MathType
-
Wiris Quizzes
-
Learning Lemur
-
CalcMe
-
MathPlayer
-
Store FAQ
-
VPAT for the electronic documentation
-
MathFlow
-
BF FAQ
-
Miscellaneous
-
Wiris Integrations
Tips to use with MathType for Windows
Reading time: 23minAdding memorable keyboard shortcuts for your most commonly used symbols and actions
Situation
As a mathematician, you often use the operator symbols "much less than" and "much greater than" in MathType and you wish there were a shortcut key for these symbols so you wouldn't have to choose them from the palette each time.
or…
You're a geometry teacher and use the "parallel to" symbol almost daily. MathType built-in shortcut of Ctrl+Shift+K , <key>|</key> ¹ is a little difficult to remember, and also requires 2 keys with one hand and one with another. You wish there were a way to change this shortcut to something easier to remember and requiring only 1 or 2 keys instead of 3.
MathType not only has built-in keyboard shortcuts for most symbols, templates, and menu items, but allows you to change or delete the built-in shortcuts as well as create your own new ones. This tip shows you how.
¹Some shortcut keys in MathType require pressing and releasing one key combination, then pressing and releasing another. We use the comma to distinguish between the first keypress combination and the second. Thus, Ctrl+Shift+K , <key>|</key> means press and release the Ctrl , Shift , and K keys, then press and release the <key>|</key> key. MathType will allow 4 seconds between keypress combinations.
Solution
The main method for customizing MathType shortcuts is via the Customize Keyboard dialog. To open this dialog, choose the Customize Keyboard command from the Preferences menu.

In the second example situation above, we mentioned the "parallel to" symbol. Looking at the Customize Keyboard dialog, it may not be obvious which of the listed commands to choose and what to do next. This explanation should help:
| Formatting | "Commands for formatting equation elements". This covers things like nudging commands and inserting tabs and new lines. |
|---|---|
| Recently Used Symbols and Templates | "Commands corresponding to symbols or templates used during this session". This is pretty self-explanatory, and will be covered in more detail later in this Tip. |
| Menu Commands | "Commands for items appearing on the menu bar". Commands like "Save", "Define Sizes", and yes, even "Customize Keyboard" are included here. |
| Navigation and Selection | "Commands for moving around and/or selecting items in the current equation". Most of these are obvious and intuitive, such as using the Backspace key for deleting the item to the left of the insertion point. |
| Keyboard Modifiers (one-shots) | "Commands that affect the behavior of the following typed command only". In other words, these keyboard shortcuts affect only the next character you type, but not characters beyond that. When you use a "one-shot" shortcut, you have 4 seconds to press the next key, or it is as if you never pressed the shortcut. One of the common "one-shot" hotkeys is Ctrl+G for typing Greek letters. Ctrl+G followed by an a , for example, results in the lower-case Greek letter α. |
| Toolbar Commands | "Commands for items appearing on the toolbar". Affects not only items physically on the MathType toolbar, but things like "focus". When a symbol or template in the palette menus has the focus, it is displayed with a raised outline around it to indicate that if you click on it or press Enter the symbol or template will be inserted into the equation. |
| Window Control | "Commands for controlling the application's windows" -- Maximize, Minimize, etc. |
| All Symbols/All Templates | These contain the symbols and templates included on MathType symbol and template palettes. |
So, since the "parallel to" symbol is, well, a symbol, our next step is to click the + to the left of the "All Symbols" command. Notice that the items are listed alphabetically, so scroll down to the entry "Parallel to from Extra Math style (Ctrl+Shift+K,|)". Several things to note here:
- "Extra Math style" means this symbol will come from the font you've defined for Extra Math style. By default, this font is "MT Extra".
- If a shortcut key already exists for an item in the list, it will be shown here. Note this is the exact text that will be displayed in MathType status bar when you point to an item with the mouse.
- Some of the lists in the Customize Keyboard dialog can be quite long. To go quickly to the item you want, simply type the first few characters of the name of the item. For example, in this case, once we click the + next to "All Symbols", we could type par and the focus would advance to that position in the list.
- Once a command is chosen from the list, if it's a symbol or a template, the preview window will show you what this item looks like. That's a good way to verify you've chosen the one you really wanted.
We want to use the key combinationCtrl+| (which actually requires also the Shift key) for the "parallel to" symbol, so type that into the "Enter new shortcut key(s)" text entry box. In the event there's already an assignment for the keypress you've chosen, MathType will not prevent you from changing the "Assigned to" shortcut. It will warn you though, but it's your decision. It's easy to forget to click Assign, so before you click Close, verify your new shortcut is in the "Current keys" box.
It's not necessary to remove the existing Ctrl+Shift+K , <key>|</key> shortcut, but there's a reason you might want to. Recall that whenever you hover the mouse pointer over an item such as a symbol, MathType displays its description and its shortcut key in the status bar. If more than one shortcut key is assigned, MathType displays only one -- in most cases, the default shortcut key. If you want MathType to display the shortcut key you just assigned, click once on the old one to select it, then click Remove. Click Close when you're finished.

What if you don't know the name of a symbol or template, or can't find it in the list?
There is more than one answer to this question, but the easiest way around this problem is to first use it in an equation. To continue our example above, click on the parallel line symbol in the Miscellaneous Symbols palette. Open the Customize Keyboard dialog and click the + to the left of Recently Used Symbols and Templates, and you'll see the "parallel to" symbol listed there. As you continue to use MathType new items will be added to the bottom of this list.

Creating "stacked" arithmetic
Sometimes putting even the simplest math expressions into a document can be problematic. Consider this example:

Here's how you go about building one:
- In MathType's Underbar and overbar templates palette, select the Under-bar template. (If you don't know which palette this is, notice whenever you point to something with the mouse, the MathType Status Bar—the bottom of the MathType window—identifies what it is you're pointing to.)
- Type the first addend (or minuend, if it's a subtraction problem). In this case,

Make sure you press Tab after you're finished typing the mixed number, so the insertion point (cursor) is outside the fraction, like this , not like this
  .
. - Press Enter, then type the + symbol, followed by the second addend (or subtrahend, if it's a subtraction problem). In the example, that's

- Make sure the MathType insertion point (i.e., flashing cursor) is outside the fraction, but still within the Under-bar template, as in this example:
- In the Format menu, select Align Right.
- Press Tab to move outside the Under-bar template, then press Enter.
- Type the sum (or difference, for a subtraction), which in this case is

In the Format menu, select Align Right again. Note the Align Right command is specific to each template slot or "pile" (i.e., a vertical stack of lines or slots).
That completes this stacked arithmetic item. If you need more addends, just repeat steps 2 and 3 above. If you'd like more space after the plus (or minus), you can add space from the Spaces and ellipses palette. If you often use this type of expression, you might consider putting a blank, generic copy of it onto the MathType toolbar.
If you have a tip you'd like to pass along to us for possible inclusion in our Tips & Tricks, ???.
Long multiplication
Similar to the previous tip, but what if you have a long multiplication problem, with multiple addition layers between the multiplicand and the product? Something like this:
| 1234×567¯ |
|---|
Rather than use the Align Right command from the Format menu (step 5 in the previous tip), we need to use Tabs to align the digits, plus a bit of magic and mirrors.
- First let's set our tab. In order to do that, it will help to know how many digits are in the product. In our case, the product has 6 digits. If you want a digit grouping symbol in the product (i.e., a comma in the U.S.), we need to allow for that not only when we set our tab, but in the intermediate addition steps above the product. It's easier to just omit the comma, but by all means include it if to do otherwise would confuse your students. We'll omit it.
- On the tab well are 5 different tabs. The one we need is the right tab, the 3rd from the left. Click to select that one.
Note
Suggestion: Actually a sub-tip. This is a good practice anyway but especially now, and that is to use a "standard" font like Times New Roman, Calibri, Cambria ( NOT Cambria Math!), Palatino, etc. By doing so, all the digits will be the same width. If you use a "fun" font such as Comic Sans or Jokerman, digits will likely be different widths, and your numbers won't align properly in columns.
- We'll need to know where to set the tab. You can get pretty close by first typing however many digits are in your product — in our case, 6. Assuming you followed our sub-tip above, you're using a font in which all the digits have the same width, so it won't matter which digits you use here. Our 6 digits come just short of the ½-inch mark on our ruler, so we'll set the tab there. (That's for an 11-pt font; yours may be different.) To set the tab, click the bottom half of the ruler at the point where you want to set the tab. If you get it a little off, that's ok, as long as it's to the right of the digits you typed. When you're finished with the problem, if the tab is too far to the right, just click the tab and drag it to the left to align the numbers properly.
- Delete the placeholder digits you typed in the previous step.
- Now we're ready to type our multiplication, but we need to tab first. Pressing the
Tabkey in MathType moves the insertion point to the next template slot, and that's not what we want to do. To go to the next tab stop along the ruler, pressCtrl+Tab(it's the same on both Windows and Mac). Now type1234for our example. - Press
Enterto begin a new line, then tab over (that is,Ctrl+Tab). - Insert an Underbar template from the Underbar and overbar templates palette.

- Insert the multiplication operator from the Operator symbols palette —
 — then type the second row,
 567in our case. - Press
Tabto exit the Underbar template. The horizontal flashing cursor should extend all the way to the left edge of the equation editing space:Note: You may wish a little bit of space between the multiplication operator and the multiplicand. In our example, we have already added a "thin space". A quick way to add a thin space is to use the shortcut
Ctrl+Space. - Press
Ctrl+Taband type the first sub-product —8638in our case. - Press
Enterfor a new line, then pressCtrl+Taband type the second sub-product —7404in our case.
Now we have a problem. The4is not supposed to line up with the8; it's supposed to be beneath the3. Hmm. Well, you know how to insert a thin space. What if you inserted multiple thin spaces? That may work and it may not. For some fonts, 3 thin spaces looks exactly right. For others, Euclid font for one, 2 thin spaces aren't enough and 3 are too many.Note
Great. Now what? If we put a zero there, it will be mathematically correct. There's also an added reason (which we'll explain later) to use a zero. If you're in the habit of putting zeroes there anyway and having your students do so, go ahead to step #12. If you'd rather not show the zeroes though, why not use "electronic white-out"? In MathType that means use a character of the correct width and color it white. To make it white, select it, then right-click (ctrl+click Mac) the Color swatch in the status bar, and choose Other. On Windows, click to select any of the blocks that are white. On Mac, drag the slider all the way to the left for white. Click OK.
After you do that, the digit will be white but won't look white. There are at least 2 ways you can verify it's white. One is to look at the color swatch in the status bar, but the second way may be better. In MathType View menu, select the Show Nesting command. Now you can see the digit's white, and as long as you're printing on white paper or your page has a white background, etc., you're OK. - We'll use similar techniques to type the last line, but after we
Taband before we start typing digits, if we're using white zeroes at the end we need to do 2 things. First, change the color back to black. Now insert an Underbar template. You remember where that is, so go get it. Now type and insert 2 zeroes (white ones if you're using white) at the end and you've got this: - Press
Tabto exit the Underbar template, thenEnterfor a new line.Tabover, change to black (if you're using white zeroes and haven't already changed back to black), and type the product. Finished! (Notice for our example with separators — commas in our case — we had to move the tab over to the right slightly to allow for the
Long multiplication problem without separators (left) and with separators (right)
Note
Other considerations: Our finished product (no pun intended actually) looks pretty slick. What if you have a student who can't see it though, and is using a screen reader like NVDA or JAWS to have the page read aloud? Those extra digits will read aloud as zeroes, which is our bonus reason for using zeroes. Whether they're white or black won't matter; they'll read as zeroes, so there's no special consideration for accessibility other than what you're already doing.
Long division
For this tip, we'll use the same example as we used for multiplication, but in reverse. This one:

Like our previous example, we'll use Tabs to align the digits.
- First let's build the division problem. Type the divisor into the MathType equation editing area. Now choose the Long division with quotient template, and type the dividend into the slot as shown.

- Press Tab to exit the division template, then press Enter to begin a new line.
Note: Verify the position of the dotted green box representing the new line. It must be at the far left of MathType equation editing space, which in this case would be beneath the
1in the divisor. If this dotted box is beneath the6in the dividend, press Backspace (that's Delete on Mac) once, then press Tab to ensure you're outside the division template before adding the new line. - Now let's set our tab. On the tab well are 5 different tabs. The one we need is the right tab, the 3rd from the left. Click to select that one.

Note
Suggestion: Actually a sub-tip. This is a good practice anyway but especially now, and that is to use a "standard" font like Times New Roman, Calibri, Cambria ( NOT Cambria Math!), Palatino, etc. By doing so, all the digits will be the same width. If you use a "fun" font such as Comic Sans or Jokerman, digits will likely be different widths, and your numbers won't align properly in columns. - We'll need to know where to set the tab. Since our dividend determines how far-right our problem will extend (not considering remainder, which we don't cover in this tip), we want the tab to be just to the right of the units digit of the dividend. For our example, that's just a bit to the right of the ¾-inch mark on our ruler, so we'll set the tab there. (That's for an 11-pt font; yours may be different.) To set the tab, click the bottom half of the ruler at the point where you want to set the tab. Notice our tab is just slightly to the right of our units digit, but if we move it just a bit to the left, it "snaps" to a position too far left. We're at 200% zoom. In MathType View menu, hover over Zoom and select 800%. You may need to use the scrollbars to see the tab setting, but now at 800% zoom, you can make finer adjustments.
.png)
Go back to 200% when you're finished setting the tab. - Our first digit in the quotient is 5, so click up inside the quotient and type
5. Click back inside the empty slot on the new line beneath the divisor. - Now we're ready to type our intermediate steps, but we need to tab first. Pressing the
Tabkey in MathType moves the insertion point to the next template slot, and that's not what we want to do. To go to the next tab stop along the ruler, pressCtrl+Tab(it's the same on both Windows and Mac). Our first subtrahend is6170, but before we type that, we need a line beneath it. Insert an Underbar template from the Underbar and overbar templates palette..png)
Type6170inside the template, then pressTabto exit the template but remain beneath the dividend. - Our subtrahend should be beneath the divisor's leftmost digits, but it's not:

- We could insert spaces to move it over to the left, but that's inexact. x-number of spaces may move it not enough and x-plus-one spaces may move it too far.
- The exact amount of space to move it is the exact width of 2 digits. Since we're using a font with all numerals the same width, it doesn't matter for spacing which numerals we use. If we use zeroes though, it's not only spaced correctly, but it's mathematically correct as well.
- We don't really want to show the zeroes, so why not use "electronic white-out"? In MathType that means use a character of the correct width and color it white. To make it white, select it, then right-click (ctrl+click Mac) the Color swatch in the status bar, and choose Other. On Windows, click to select any of the blocks that are white. On Mac, drag the slider all the way to the left for white. Click OK. Now type 2 zeroes.
- After you do that, the digits will be white but won't look white. There are at least 2 ways you can verify it's white. One is to look at the color swatch in the status bar, but the second way may be better. In MathType View menu, select the Show Nesting command. Now you can see the digits are white, and as long as you're printing on white paper or your page has a white background, etc., you're OK. We'll leave ours in Show Nesting view.
- Change the color back to black (similarly to how you made it white, except choose black), then press
Enterto begin a new line.
- Tab over (i.e.,
Ctrl+Tab) to where the tab stop is set. We need to type our first difference, 826, and bring down the tens digit from the dividend, 7. We will need one white zero after the 7, so type8267in black and0in white. Now you've got
- Complete the rest of the division problem on your own. When you're finished, it should look like the example below. Optional: You may prefer to have subtraction signs on each of the levels of subtraction beneath the dividend. If you do, the subtraction signs are equally correct inside the underbar or outside the underbar. The example on the right shows them outside the

Long division problem without minus signs (left) and with minus signs (right) Tabs
Quick formatting of equations and identifying names & keyboard shortcuts: Using the MathType status bar
Situation
You know you can change the fonts assigned to an equation by going to the Define Styles dialog in MathType Style menu, and similarly changing the Size. You also sometimes change the color by going to the Format menu. Surely there's an easier way! Of course, the fact you're reading this in MathType Tips suggests there is indeed an easier way. What about discovering the name of a symbol in MathType palettes or the keyboard shortcut that will insert that symbol? Read on…
Solution
The bottom of the window in many software applications is called the status bar. The status bar contains much useful information. In Microsoft Word, for example, you can see which page you're editing, how many pages in the document, how many words in the document, if there are any spelling or grammar errors, etc.
MathType also has a status bar at the bottom of its window. MathType status bar normally looks like this:

(We said it "normally" looks like this. Later in this article you'll see some other information you can get from the status bar that isn't shown in its normal, default state.)
You can see in the 4 divisions of the status bar you can tell the style, size, and color of the next character typed (i.e., the style, size, and color at the current position of the insertion point), as well as the zoom value.
More than simply providing information though, each section of the status bar allows you to change the appearance of the equation you see in MathType and in most cases, the appearance of how it appears outside of MathType
Right-click/ctrl+click actions
Right-clicking Style or Size (ctrl+click on Mac) gives the same menu as selecting the menu of the same name in the menu bar. In the case of Color and Zoom, it's the same as the same-named sub-menus of the Format and Zoom menus, respectively:


Double-click actions
Double-clicking a section brings up the Define dialog for that section: Define Styles, Define Sizes, Zoom, and Color.


Other information in MathType's status bar
The features of the status bar as shown above are when the status bar is in its normal state. Watch this animation to see some of the other information you can find in the status bar:

Whenever you point to something with the mouse, the description of whatever is beneath the mouse pointer is shown in the status bar. If there is a shortcut assigned to that item, the shortcut is shown as well.

We hope this has been helpful. If you have a tip you'd like to pass along to us for possible inclusion in our Tips & Tricks,let us know.
Insert and edit MathType equations using only the keyboard
Situation
Have you ever wondered if there's a way to type an entire equation in MathType using only the keyboard? Actually, MathType was created both for those who prefer to build their equations by pointing and clicking on menu commands and palette icons, as well as those who prefer to keep their fingers on the keyboard and use the mouse or touchpad as little as possible. This tip describes how to create equations using only the keyboard.
In this tip, you will learn these techniques:
- Find out which keyboard shortcut is assigned to a particular symbol, template, or menu item.
- Create your own shortcuts or change existing ones.
- Enter equations with TeX.
Which shortcut is which?
How do you go about discovering the various keyboard shortcuts assigned to the various components that make up your equation? The simplest way is to find the item in the appropriate palette and point to it with the mouse. While hovering the mouse pointer over it, look at the status bar and both the item description and the shortcut will be displayed there:

If you're using Windows, have you ever noticed those underlined characters in the names on the menu bar? Depending on your display settings, they may not be underlined, but these underlined characters also identify shortcut keys. (This feature is disabled by default in Windows 10. This article describes how to enable it.) To access a menu, press Alt then press the letter underlined in the menu title. While the menu is expanded as in the example below, you can use the arrow keys to go from one menu to the next, or to navigate up and down an individual menu. To choose one of the commands, press Enter to choose the highlighted command, or press the underlined character in the command (whether the command is highlighted or not). For the example shown below, you can use the keyboard sequence Alt , E , A to choose the Clear command from the Edit menu.

Some things to note when reading shortcut key abbreviations:
- In a shortcut like the example above --
Alt,E,A-- the commas are merely separators; they are not part of the shortcut. - Sometimes you'll see the comma in connection with a keyboard shortcut requiring more than one combination of keys. The Greek letter omega, for example, has a shortcut of
Ctrl+G, followed byW. You'll see this shortcut written like this: <key>Ctrl+G, W</key> . The comma in this case means that you must first press and release theCtrl+Gcombination, then pressWbefore the omega will appear in your equation. When using shortcuts like this, MathType gives you 4 seconds to press the second key or combination of keys after you release the first one. - Although it is common to identify keyboard shortcuts by using capital letters, do not press
Shiftunless it is specifically stated. For example,Ctrl+Shift+Eis the shortcut for switching to Text style. - Keys separated by the + symbol must be depressed at the same time, so in the case of Text style, you must press
CtrlandShiftwhile pressing and releasingE. It's not necessary to precisely time these 3 keypresses to occur simultaneously. Simply keepCtrlandShiftdepressed while pressing and releasingE, then release the other 2 keys. - Also notice in the screen shot above, if a menu item has a shortcut key associated with it, the shortcut will be identified on the menu itself rather than on the status bar.
- The technique of using
Altto access menus works in any Windows application.
Creating your own shortcuts
Full instructions on this are really the subject for a separate tip, but there are two methods of creating keyboard shortcuts that we'll briefly mention here. For further instructions in these techniques, refer to the MathType documentation.
If you're wanting to create or change a keyboard shortcut for a symbol, there are two ways to accomplish this. The first method is to use the Customize Keyboard command in the Preferences menu. The second method is to choose the Insert Symbol command from the Edit menu:

If you need to create or change a shortcut key for a template or a menu command, your only choice is to use the Customize Keyboard command.
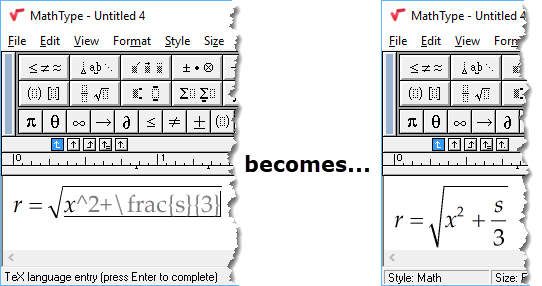
Creating equations by entering TeX into MathType
If you know TeX or LaTeX, you can simply type it directly into MathType, either for the entire equation or part of it. Press Enter to complete the equation:
Moving MathType settings to a new Mac computer
Situation:
There are at least two reasons why you might want to move your custom MathType settings (preference files, keyboard shortcuts, custom toolbar) to a new computer:
You're retiring an old computer and you want to use MathType on your new computer.
You have a computer at work and one at home, and you want the same MathType settings on each.
Preparation:
The first thing to do before moving your custom settings is to make sure you've completely exited MathType on both computers. There's more to this than simply closing the MathType windows on both computers; you also need to exit the MathType program:

If you're in the habit of inserting MathType equations into Word by clicking the "stoplight" (arrow 1 above), that's a good technique, but it doesn't close MathType MathType remains running in the background, which makes it operate faster the next time you need it. To exit MathType you need to use the Quit command, shown by arrow 2 above. Notice the keyboard shortcut Command+Q .
One way to check to see if MathType is still running is to hold down Command as you press and release Tab . If you see the MathType icon (as shown below), then MathType is still running. Keep Command depressed as you press & release Tab until MathType is highlighted, then release Command . Now close MathType

What if my new computer is a Mac and my old one is running Windows?
If you're moving from Windows to Mac (or maybe you still use your Windows computer and want to also use MathType on your new Mac), the first thing to note is that your product key for MathType for Windows will also work for MathType for Mac. You don't need to make a separate purchase and you don't need special authorization from us. It's OK.
If you are moving from Windows, the way you ensure MathType is completely closed is slightly different than what's described above for Mac. On your Windows computer, just like on a Mac, there's more to it than simply closing the MathType window. You also need to exit the MathType Server. The MathType Server doesn't have anything to do with a network server; its purpose is to keep MathType open in the background so it operates faster after you first use it. Note: Another important thing to know about the MathType Server is that if it is running, any customizations to the toolbar or other MathType settings will not be saved until the Server closes.
To find and close the MathType Server, look in the "Notification Area" in the lower right of your screen, near the clock:

Click the MathType Server icon, then click Exit.
Follow the instructions below for copying your MathType toolbar, then save it at the location on your Mac identified in the next section:
- On Windows, there are 2 copies of the toolbar file, toolbar.eql. There is one in the MathType installation directory in Program Files. This is not the custom one, and this is not the one you need to copy to your new computer. This is the default one that's installed when you install MathType and is used by MathType to restore the factory toolbar if it ever needs to do that. The custom toolbar is in a hidden folder at this location:
C:\Users\[YourUserName]\AppData\Roaming\Design Science\DSMT7 - If you look there and can't find it, you probably don’t have File Explorer set to show hidden files & folders. Here's how to change that:
- At the top of the File Explorer window, click View and tick the box next to Hidden Items:

- Once you do that, you should be able to see the AppData folder mentioned above, and this is where your custom toolbar will be. Copy it and move it to your new computer at the location given in the next section.
- At the top of the File Explorer window, click View and tick the box next to Hidden Items:
Move or copy the custom MathType toolbar
There are 2 copies of the toolbar file, toolbar.eql, on your computer. There is one in the MathType installation directory in your Applications folder. This is not the custom toolbar, and this is not the one you need to copy to your new computer. This is the default one that's installed when you install MathType and is used by MathType to restore the factory toolbar if it ever needs to do that. Here's how to find the custom toolbar:
- The MathType customizable toolbar is located in your user Library folder. Please note this is a HIDDEN folder, and is NOT the Library folder you'll find at "Macintosh HD/Library".
- To open the hidden Library folder, open a Finder window, and in the menu bar, click the Go menu.
- With the Go menu expanded, hold down <key>alt/option</key>, and you'll see Library appear, beneath Home.
- Keep holding <key>alt/option</key> while you click Library.
- Inside Library, click Application Support. Save your toolbar file there.
Move or copy MathType keyboard shortcuts and other settings
Note this is possible, but is an involved process, and fairly touchy, so we don't provide instructions here. If this is critical to you, please email us and we'll try to help.
Move or copy MathType preference files and other translators
One of MathType powerful features is the ability to save and load "preference files", which save your font information and spacing settings. If you have custom preference files and/or custom MathType output translators, copy these 2 folders over to the new computer as well:
Applications/MathType/Preferences Applications/MathType/Translators
After you finish copying these files to your new computer, all your MathType settings should be restored. Reboot if you want, but it's not necessary.
Moving MathType settings to a new Windows computer
Situation:
There are at least two reasons why you might want to move your custom MathType settings (preference files, keyboard shortcuts, custom toolbar) to a new computer:
- You're retiring an old computer and you want to use MathType on your new computer.
- You have a computer at work and one at home, and you want the same MathType settings on each.
Preparation:
The first thing to do before moving your custom settings is to make sure you've completely exited MathType on both computers. There's more to this than simply closing the MathType windows on both computers; you also need to exit the MathType Server. The MathType Server doesn't have anything to do with a network server; its purpose is to keep MathType open in the background so it operates faster after you first use it. Note: Another important thing to know about the MathType Server is that if it is running, any customizations to the toolbar or other MathType settings will not be saved until the Server closes.
To find and close the MathType Server, look in the "Notification Area" in the lower right of your screen, near the clock:

Click the MathType Server icon, then click Exit.
What if my old computer is a Mac and my new one is Windows?
If you're moving from Mac to Windows (or maybe you still use your Mac and want to also use MathType on your new Windows computer), the first thing to note is that your product key for MathType for Mac will also work for MathType for Windows. You don't need to make a separate purchase and you don't need special authorization from us. It's OK.
If you are moving from a Mac, there is nothing on the Mac that corresponds to the MathType Server on Windows. Follow the instructions above to close the MathType Server on Windows, but on the Mac, when you close the MathType program, there is no other step to perform. Note though, it's still possible to close the MathType window (by clicking the red "stoplight" in the upper left corner of the window), but the program continues to run. To close the MathType program, you must use the Quit command on the MathType menu (shortcut key Command+Q ).
Follow the instructions below for copying your MathType toolbar, then save it at the location on Windows identified in the next section:
- On the Mac, the MathType customizable toolbar is located in your user Library folder. Please note this is a HIDDEN folder, and is NOT the Library folder that you'll find at "Macintosh HD/Library".
- To open the hidden Library folder, open a Finder window, and in the menu bar, click the Go menu.
- With the Go menu expanded, hold down <key>alt/option</key> , and you'll see Library appear, beneath Home.
- Keep holding <key>alt/option</key> while you click Library.
- Inside Library, click Application Support. The toolbar file there is the one you want to copy over to Windows at the location shown in the next section.
Caution
The process described above is only for the customizable toolbar. There's not a way to transfer keyboard shortcuts from Mac to Windows.
Move or copy the custom MathType toolbar
The main file to transfer is your customized toolbar. There are 2 copies of the toolbar file, toolbar.eql, on your computer. There is one in the MathType installation directory in Program Files. This is not the custom toolbar, and this is not the one you need to copy to your new computer. This is the default one that's installed when you install MathType and is used by MathType to restore the factory toolbar if it ever needs to do that. The custom toolbar is in a hidden folder at this location:
C:\Users\[YourUserName]\AppData\Roaming\Design Science\DSMT7
If you look there and can't find it, you probably don’t have File Explorer set to show hidden files & folders. Here's how to change that:
- At the top of the File Explorer window, click View and tick the box next to Hidden Items:
.png)
- Once you do that, you should be able to see the AppData folder mentioned above, and this is where your custom toolbar will be. Copy it and move it to your new computer at the location given in the next section.
Move or copy MathType keyboard shortcuts and other settings
MathType custom shortcuts, windows settings, and other preferences are saved in a registry setting. Open the Registry Editor by holding down the Windows key (the key that looks like a Windows logo), press and release the R key, then release the Windows key. (This shortcut may vary on non-English keyboards.) Once the Run dialog is open, type regedit and press Enter. Navigate to the path shown here:

When you find this registry key, right-click and choose Export. Give it a file name and note where you save it (Desktop is a good place). Use a thumb drive or other method to move this registry key file to your new computer. Double-click it and answer the prompt that you do want to continue, and you'll fairly immediately receive a confirmation that the registry keys were successfully imported.
Caution
The process described above is only for Windows-to-Windows transfers. There's not a way to transfer keyboard shortcuts from Mac to Windows.
Move or copy MathType preference files and other translators
One of MathType powerful features is the ability to save and load "preference files", which save your font information and spacing settings. If you have custom preference files and/or custom MathType output translators, copy these 2 folders and install them onto the new computer as well (note that for 32-bit Windows, there will be no (x86) as shown below):
C:\Program Files (x86)\MathType\Preferences
C:\Program Files (x86)\MathType\Translators
After you finish copying these files to your new computer, all your MathType settings should be restored. Reboot if you want, but it's not necessary.